Welcome back, dear Reader!
This article comes straight from practice and might be interesting to translators and customers alike, because we will have a look at how to best prepare spreadsheet files for translation.
Often, spreadsheet files – such as MS Excel, LibreOffice Calc or even plain CSV tables – are generated for export/import actions rather than written, for example by content management systems or internationalization / localization (i18n/l10n) systems for software user interfaces.
Now, one essential thing to know about translation environment tools (Trados Studio, MemoQ, OmegaT, …) is: A properly configured CAT tool will not import/export hidden text from/into MS Word and neither will it import/export hidden cells from/into MS Excel. This is of utmost importance, because it makes multilingual tables translatable at all!
Clients are sending two types of spreadsheets to DeFrEnT for translation: Those in which original (“source text”) and translation (“target text”) are shown side by side in two columns and those in which source and target texts are presented “top-down” in subsequent rows:
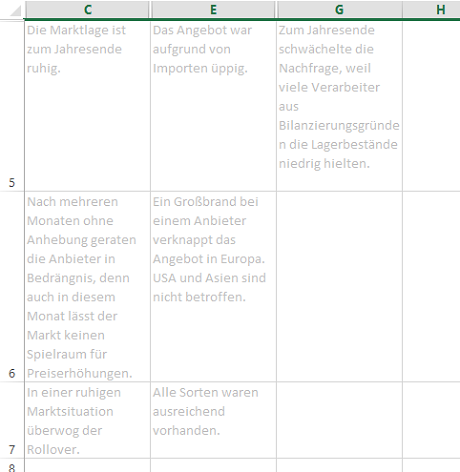
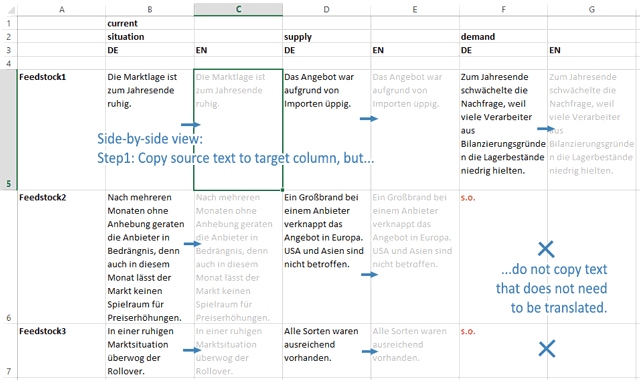
With side-by-side (column-based) table layouts, we will thus proceed to copy all translatable cells from from the source column(s) into the target column(s), and then hide everything else from the CAT tool by Ctrl+Selecting, for example, the columns A, B, D and F, followed by a right-click on one of those column headers and clicking on “Hide” (or “Ausblenden” in German).
 Then we do the same with rows 1-4 as these header cells don’t need to be translated either. We are left with only those cells that shall later contain the English translations. This also serves to protect content that the translator or his CAT tool shall not touch from any erroneous editing:
The second, row-based type of tables is more tricky. Excel does not allow to select every second row or to copy a selection range into every second row:
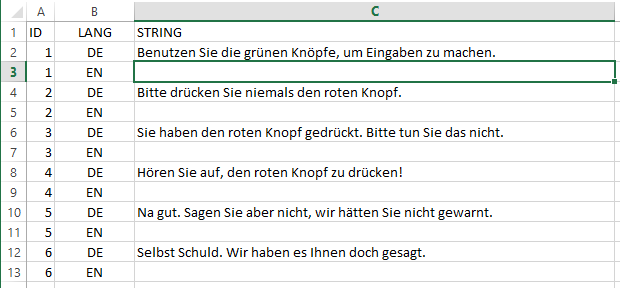 Usually, these kind of software strings are better delivered as Gettext PO files or XML, but sometimes, we get them as Excel tables. Due to the copy-paste restriction and possibly very large files, we cannot copy all those strings by hand. What we need here, are two VB macros: One to copy a selection of first rows to all second rows and another macro to hide all first rows for us.
Start by unhiding Excel’s “Developer Tools” ribbon if it is not already visible. Click on “Macros”, enter an appropriate name for your new macro and click on “Create”. The Macro console opens and you can enter the following two macros (which I have named in German, but you can change the name to whatever suits you):
Sub ZweiteZellenMitErstenFuellen()

'This one copies first rows into second rows within a selection

Dim Bereich As Range, Zelle As Range, Zeile As Long

Zeile = 2

Set Bereich = Selection

While Zeile < Bereich.Rows.Count

Bereich.Cells(Zeile, 1) = Bereich.Cells(Zeile, 1).Offset(-1, 0)

Zeile = Zeile + 2

Wend

End Sub
Sub ErsteZeilenAusblenden()

'This one hides first rows within a selection

Dim Zeile As Long

Zeile = 1

Set Bereich = Selection

While Zeile < Bereich.Rows.Count

Bereich.Cells(Zeile, 1).EntireRow.Hidden = True

Zeile = Zeile + 2

Wend

End Sub
Then click on Save and save the Excel file as .xlsm (Excel sheet with Macros). This doesn’t need to be the client’s file. In fact, it shouldn’t! You can create an empty .xlsm file just to house your makros and execute them on the customer’s file as long as both files are open.
So, with your macros saved to an otherwise empty myxl8macros.xlsm (or whatever), you’ll go back to that client file from the screenshot above and select column C from row 2 downwards (we obviously don’t want to copy the word “STRING” downwards). For some reason, you need to select one extra row beyond the last target row or it won’t copy the last row (i.e. select including C14 in the above example).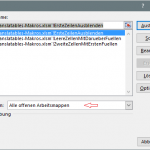
Click on Macros in your Developer Tools ribbon. It should show you a list of the macros in myxl8macros.xlsm as long as “Macros from: All open Spreadsheets” is selected (see screenshot to the right). Execute ZweiteZellenMitErstenFuellen and the rows will be copied. Then execute ErsteZeilenAusblenden on the same selection: Voilà!
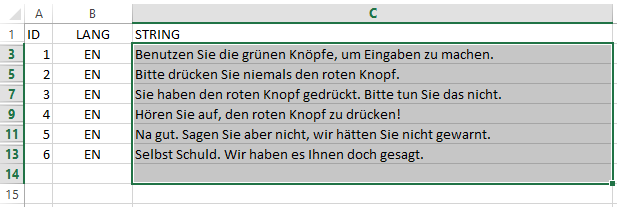 All source text DE rows have been copied to target EN rows and DE rows are hidden. Finish by manually hiding the first title row and the A and B columns, as before. Only translatable strings are visible now.
In both cases, whether with a column- or row-based spreadsheet, you are now ready to save your client file and import it into your CAT tool for translation. You will only get to see what needs to be translated.
 Important: After exporting from the CAT tool, just remember to unhide all those hidden rows and columns by doing Ctrl+A (select all), right-click on a column/row header and click on “Show” before you deliver the file to your customer. Most users are not used to working with hidden content and will accusingly ask why their file looks totally corrupted instead of noticing that their spreadsheet starts with column C instead of A.
I hope this has helped you better understand how professional translators such as Christopher Köbel of DeFrEnT preprocess, work on and post-process spreadsheets so you can get the expected translation results. It should also show that column-based layouts are much easier to translate than row-based files.
Do you know other tricks or tips on preparing spreadsheets for translation? Did you encounter other difficulties? Got useful IF-Formulas to selectively copy content from source to target? Leave a comment!
1 comment so far